
Features of LED torches
In order to purchase the right torches for your light painting needs, you should be aware of some basic terms, functions and features of the different torches. Many manufacturers only specify the brightness, the number of modes and brightness levels and the runtime. Size and weight are also easy to determine. However, some of the features that are relevant for the Light Painter leave you in the dark for the time being. Whether the torch is controlled via PWM and whether it has a homogeneous strobe are decisive purchasing arguments for the light painter, but information from the manufacturer or seller is usually lacking.
With this article, I try to shed some light on the subject, even if this article cannot completely illuminate all aspects. I will try to avoid explaining functions and features that are of little importance to the light painter.
Technical Terms
Lumens
Lumen is the physical unit of luminous flux. This should not be confused with the unit for illuminance, lux. The unit lumen does not say much at first. It can only be compared with two similar lamps with the same beam angle. The 10000 lumen lamp with the 120° beam angle brightly illuminates a wide part of the surroundings. However, the luminous range is quite small. The LEP torch with 500 lumens has a very small beam angle and clearly illuminates objects at a distance of over 1000 metres. Therefore, you should always take a look at the beam angle of the torch to be able to estimate the brightness with which the torch then actually paints in the light painting.
If you connect the torch directly to a tool, on the other hand, most of the light will reach the tool, regardless of how large or small the beam angle is.
The luminous flux can be measured directly with an integrating sphere. The light is evenly distributed in this sphere and then measured.
Lux
Lux is the unit of illuminance. 1 lux describes the illuminance with which a point light source with 1 lumen luminous flux illuminates an area of one square metre. The illuminance therefore changes depending on the beam angle of the light source (see above).
Candela
The unit candela describes the luminous intensity, i.e. the quontient of the luminous flux and the solid angle. A candle radiates light evenly in all directions and has approx. 1 candela (cd). This is where the name for this unit comes from, candela = Latin candle. If the light is bundled and emitted at a rather narrow angle, for example if a curved reflector is mounted behind the candle, the luminous intensity is correspondingly greater.
Most manufacturers of torches do not give values for illuminance (lux) or luminous intensity (cd).
Electrical power
In most cases, the electrical power is not specified. Actually, this information is not very interesting for torches. If the type of LED used is specified, you can at least find out its power on the manufacturer’s data sheet. The total electrical power including the driver can usually only be determined by measuring the current and voltage and calculating (P=U*I).
Electrical current
With some torches, such as the Convoy S2, the maximum current that the driver pushes into the LED is specified. With the S2, you can also choose from different drivers and thus different maximum currents. The higher the current, the higher the luminous flux of the torch. If the manufacturer does not specify the current, measuring helps, as already mentioned above.
Heat loss
LED torches do not have an efficiency of 100%. A more or less large part of the energy is converted into heat. With cleanly built and programmed drivers and modern efficient LEDs, a very high efficiency of almost 90% is achieved. For comparison, the efficiency of a conventional light bulb is 1 to 2%.
But even the most efficient torch produces heat during operation. In winter, this can sometimes be quite useful because you can warm your hands. In most cases, however, you don’t want this heat. On the one hand, the battery is unnecessarily discharged, on the other hand, the heat damages the electronics in the torch as well as the battery. To protect against overheating, most torches reduce the brightness, and thus the current, after more or less time.
power supply
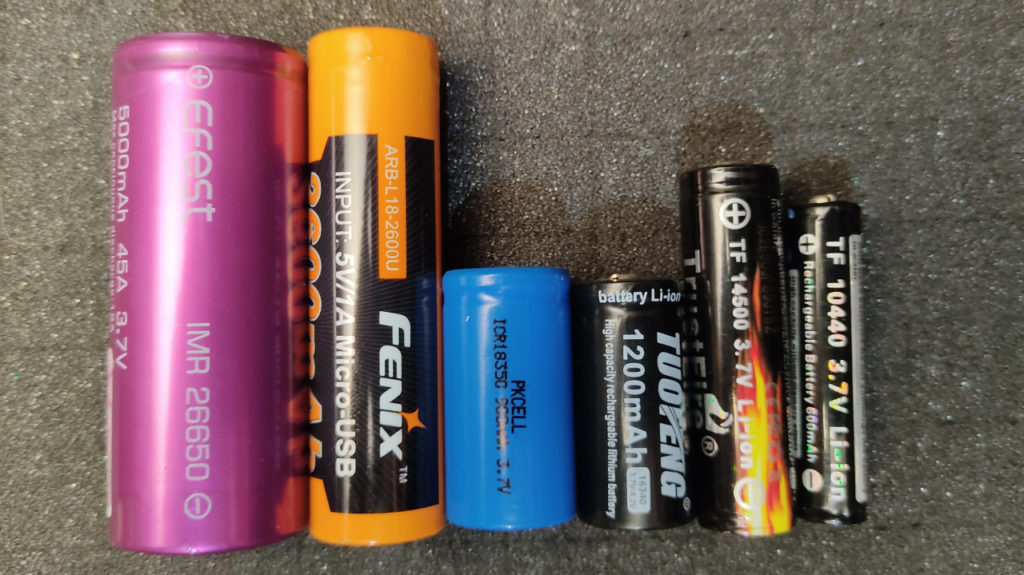
In light painting, mainly torches with high-power LEDs are used. For this reason, these torches work with lithium cells. The rated voltage of these cells is 3.7 V, in a fully charged state the voltage is 4.2 V. Furthermore, LiIon batteries can deliver high currents. Some 18650 cells can deliver 30 or even 40 amps for short periods and deliver 10 amps continuous current. 10 amps * 4.2 volts gives a power of 42 watts.
If you combine several cells, the (theoretical) power is correspondingly greater. “Normal” batteries and NiMH rechargeable batteries cannot deliver such high currents. No AA cell can deliver more than 1 ampere. The voltage is also lower at 1.5 or 1.2 volts. It is therefore not possible to operate a 10 Watt LED with AA cells. This would then deliver about 1000 lumens. 1 ampere * 1.5 volts = 1.5 watts. So with ten batteries, only 15 watts of power would be possible. So be careful with the tempting offer of the online dealer – 50000 lumens with 4 AA batteries are not even physically possible.
I wrote a more detailed article on the subject of rechargeable batteries at the beginning of this year.
Beam Distance
Some manufacturers of good, high-quality torches like Fenix usually state the light range. In the case of the PD36R, this is 283 metres. So at the highest setting, I can make things visible to the human eye at a distance of 283 metres. For most tasks in light painting, however, this specification is usually not very relevant. Since most torches do not have a very narrow light cone, the immediate surroundings of the camera will be burnt out by the time objects at a greater distance become visible on the sensor. The Light Painter therefore has no choice but to walk to the spot that is to be visible in the Light Painting and then illuminate it from a short distance.
Torches with a focus system are an exception. With these you can change the light cone, ideally from very wide to very narrow. It is therefore easier to illuminate specific parts at a greater distance with such lamps. However, the number of good torches with a focus system is quite limited. Torches like the Led Lenser X21R are actually well suited if they were not so large, heavy, expensive and, compared to modern torches, very weak. At the latest, the permanently installed battery, which is almost impossible to get as a spare part, spoils the fun of such torches for me.
Runtime
Almost all manufacturers provide information on the runtime on the packaging. For marketing reasons, most of them write the maximum luminous flux and the longest runtime in bold letters on the packaging. For the X21R, this is 5000 lumens and 40 hours. Of course, the torch does not run for 40 hours with 5000 lumens. The torch achieves this luminous duration at the lowest possible level with 200 lumens.
Very many torches are supplied without a battery. If the manufacturer specifies runtimes for the various modes, you should take a look at the technical data. Manufacturers such as Fenix state which battery they used to measure the runtime. If the battery used for the test has a capacity of 3500mAh, but your own batteries only have 2600mAh, the real runtime will of course be correspondingly shorter. Apart from that, the runtime depends on the ambient temperature because the capacity decreases at low temperatures. The data always refers to an ambient temperature of 20°C. At 0°C, depending on the ambient temperature, the battery life is reduced. At 0°C, depending on the type and quality of the cell, hardly 50% of it remains usable.
In the meantime, we use almost exclusively torches that are operated either exclusively or at least with adapters with 18650 batteries. For this reason, battery life is not the most important aspect when choosing a suitable torch. When the battery is empty, a fresh one is inserted into the torch and the light painting continues.
PWM
Pulse width modulation (PWM) is a technique often used in torches to reduce brightness. The lamp is switched on and off at high frequency. This is usually not visible to the human eye, but the camera sees it. If you paint a light trace into the picture with such a torch, it is not continuous but interrupted. This can be seen quite well in the example picture. The faster you paint the light trace, the larger these gaps become. The manufacturers usually do not specify whether the lamp works with PWM or not.
And you won’t find any information about the frequency of the PWM. Only a test or a search on the Internet will help. The esteemed Stephen Knight tests a lot of torches and usually also measures the frequency of the PWM or indicates whether it is visible or not. If the frequency is in the upper MHz range, the interruptions are no longer visible in the light painting, no one can move the torch that fast.
Strobe

To paint intentionally interrupted light traces in the light painting, use the strobe mode. Most torches now have this function. In most torches, this function is intended for self-defence. The bright, fast-flashing light is intended to scare off any attacker. For this reason, the strobe usually runs at the brightest level. With many lamps, this would be much too bright for a light painting like this. Here, a small, older lamp with 300 lumens was used. Recently, many torches no longer have a normal strobe.
The frequency changes at short intervals. It is not possible to paint a uniform object like this orb. In very few cases do the manufacturers state whether the strobe is homogeneous and at what frequency it works. Only very few torches save the strobe or can be switched on directly in it. The only really good torch so far for working with strobe in light painting is the Light Painters lamp from Light Painting Paradise. With this lamp, the strobe works in each of the 8 brightness levels, the frequency of the strobe can be selected in 10 levels and the mode can be saved and thus switched on directly. It doesn’t get any better than this.
SOS, candlelight, thunderstorm…
Some manufacturers program the craziest modes into their torches. Most of them are not very interesting for light painting. But maybe I’ll do a light painting with the candle mode of the Emissar D4V2 soon 😉
Tint
The colour temperature or tint indicates how warm or cold the LED light of the torch is. The higher the value, the colder the light, i.e. the proportion of blue light is higher. The colour temperature is given in Kelvin or K for short. Values below 3300K are called warm white and correspond approximately to the colour temperature of an incandescent lamp or sunlight during sunset. Values between 3300 and 5300K are called neutral white, 5000K correspond to normal daylight. All values above this are cold white. When looking directly at a clear sky, this corresponds to about 8000K.

I used a 3000K torch for the illumination in this light painting. This makes the scene look very warm. I think it suits the rusty lost place quite well. With a colder lamp, much of the atmosphere would be lost.
Warmer LEDs usually have a slightly lower luminosity than the colder versions of the same LED.
For working with Plexi blades or other tools, the colour temperature only plays a subordinate role. If you work with colour filters, at the latest, you can hardly see any difference.
Colour rendering index – CRI
I recently wrote a separate article on this topic. You can find it here. But don’t forget to come back 😉
Protection class
The degree of protection, actually the protection class, describes the sealing of the housing against solid particles and water. In addition, it describes the protection against contact for devices with higher operating voltages. The degree of protection is indicated in the form IP (Ingress Protection) followed by a two-digit number. The first number indicates the protection against contact as well as against the ingress of solid particles. 0 means no protection at all, the highest number 6 means that the device is completely protected against contact as well as dust-tight. For torches, you will find either the 6 or an X. The second number indicates protection against water. Here the scale goes up to 9. 7 ensures protection against temporary submersion, 8 against permanent submersion under water. 9 means protection against a high-pressure jet. I have not found this degree of protection on any torch so far. Common specifications are IP68 or IPX8. This means that the torch can stay under water indefinitely. In addition, some manufacturers specify how long the torch will remain sealed at what maximum immersion depth. The standard does not say anything binding about the immersion depth.
Operating concept

The simplest operating concept is to control the torch via a single switch at the back, or more rarely at the head. All functions, in the simplest case only one continuous light level, are switched via this one switch. The design with a switch at the back is basically the classic torch design. In the vast majority of lamps, the rear switch is a latching switch.
In most cases, the torch is already lit when the switch is half-pressed, i.e. not yet engaged (forward clicky). This allows you to “flash” with the torch, for example to flash in a model. This works particularly well with the Fenix PD36R (in the picture, front row, second from the left). The disadvantage of torches with only one switch and several modes is that the mode changes with each “flash”.
If the torch does not light until it clicks, this is called reverse clicky. For many light painting applications, a Forward Clicky is the better choice. Usually, the manufacturers of the torches do not specify which type of switch is installed. And then there are torches like the Led Lenser X21R. The turbo mode only works when the switch is pressed halfway. So when you switch the torch on or off, it briefly blasts 5000 lumens into the light painting and then possibly spoils the picture. After all, you are forced to switch through the half position. Who thinks up such nonsense?
Switches on the torch head are always push-buttons and do not engage. At the moment, I can’t think of any torch that has a switch built into the head. With these torches, a short flash is only possible if the torch can be switched to momentary mode. In the picture these are the Fenix LR35R, Sofirn SP36, Convoy M3 (upper row 2, 3 and 4, Emissar D4V2 and UltraTac K18 lower row 4 and 5).
Some torches have two switches, one at the rear and another at the head. The rear switch turns the torch on and off. The front switch is used to change the mode. The picture shows two of these torches, the Fenix PD36R and the Light Painters torch from Light Painting Paradise (second and third from the left in the bottom row). This concept is well suited to the requirements of light painting. One selects the mode and can then switch the torch on and off in this mode, even briefly by pressing the switch.
In the example picture, two special cases can be seen. One is the yellow diving torch, which has no switch at all. This torch lights up when you close the back cap. This makes sense for a waterproof diving torch. A switch would be a weak point here, because you don’t want water to get into the inside of the torch. And then we have the Fenix FD65 (top left in the picture). This torch has two switches in the head, labelled H and L. When you press H, the torch switches to the second brightest level. If you press H again, it switches to the brightest level. With L, this works downwards, i.e. to the weaker light levels. When the torch is on, you can switch through all the levels with the two switches. This operating concept has not caught on. I don’t think it’s really cool, even though the FD65 is one of my best torches. It’s very bright, small, light and has the best focusing system ever.
User Interface

The simplest variant of a UI is on and off in a single brightness level. The most advanced is the Anduril UI (see graphic). A single button controls either ramping or steps, different strobe modes as well as modes for changing the programming. On the one hand, this is quite interesting, but on the other hand, it can quickly drive the Light Painter crazy. And woe betide you if you can’t remember what you set the last time you used it, or if the software goes haywire.
In between, there are many different approaches. Many torches are currently capable of four or five brightness levels plus strobe and SOS. Mostly, the modes are controlled by one or two switches. For light painting work, it is very useful if the torch either automatically saves the desired mode or can save it by holding the switch for a longer time.
Besides the Anduril UI, the Bisotti UI, also open source, is quite common. Here the concept is slightly different. Optionally, you can programme the torch to save the last active mode or not. In addition, different groups can be programmed, with which the torch then works. The simplest variant is a single mode (100% continuous light) up to groups of 8 different modes, which are then switched through one after the other with the switch. In contrast to the Anduril UI, the Biscotti UI does not know any ramping, i.e. the stepless regulation of the brightness.
Design, size, material
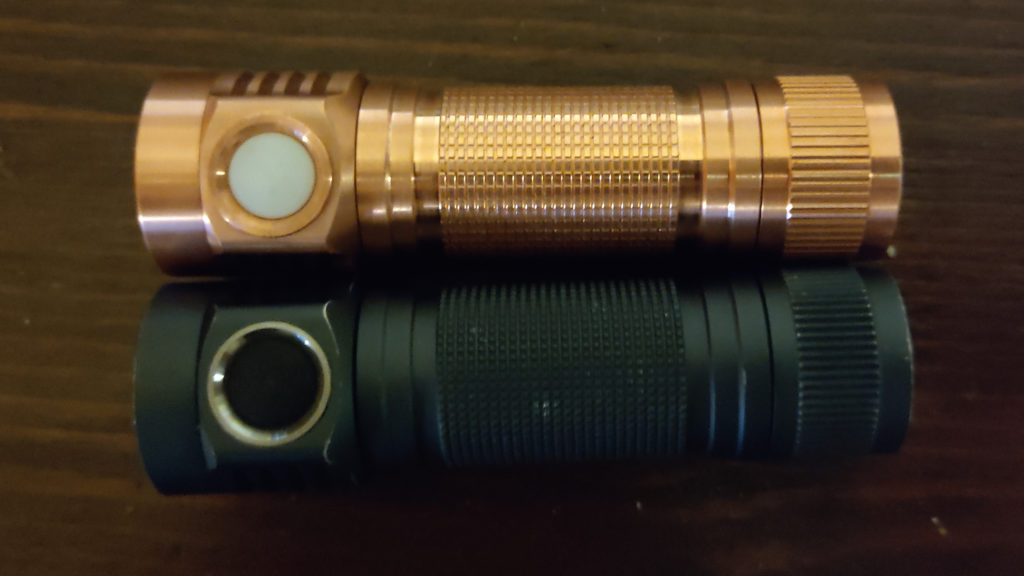
The vast majority of torches are made of aluminium. Aluminium is light, stable and a fairly acceptable heat conductor. The heat loss from the driver and the LED is therefore dissipated well from the inside of the torch. A few torches are made of copper. Copper is a much better heat conductor than aluminium, but a torch made of copper is much heavier, in the case of the Emisar D4V2, the copper version is almost twice as heavy, and above all very expensive.
In addition, the D4V2, and also some other torches, are available in titanium. Titanium is pretty cool and very robust. You can certainly drive over such a torch in an omnibus without being damaged. However, titanium is not a good conductor of heat and is even more expensive than copper. For these reasons, I have not yet been able to bring myself to buy a titanium torch. With titanium, copper and unpainted or brightly anodised aluminium, there is a risk that the torch itself will become visible in light painting. For this reason, most of my torches are black.
The design and size of the torch is of secondary importance for use in illuminating the light painting scene. However, if I want to use the torch for painting light trails, it is important that the torch fits into the usual connectors and adapters, is held securely during light painting and that I can still reach the switch(es). In the case of the Emissar D4V2, at least the last point is not fulfilled. When I put this torch into the adapter from Light Painting Paradise or the Universal Connector, I can no longer reach the switch because it is very far forward. When choosing the right Light Painting torch, you should pay attention to such things as well as to the head diameter of the torch. If the torch just fits into the adapter, it usually does not sit very firmly and securely in the adapter and is in danger of slipping out of the adapter if it is moved quickly.
Recommendations
Finally, I would like to recommend a few torches to you:
- FENIX PD36R – for me currently the best EDC torch – max. 1600 lumens – control via two switches – 5000mAh battery – perfect workmanship – this torch always hangs on my belt.
- FENIX LR35R – brutally bright lamp (max. 10000 lumens) and still small and handy
- FENIX FD65 – bright torch with very good focus – unfortunately this torch is no longer available
- FENIX FD30 and FD41 – smaller focus torches for even illumination of (longer) light painting tools
- Convoy S2+ – small, solid, robust torch for the small purse – available in many versions with different LED’s including UV
- Emissar D4V2 26650 (link to the 18650 copper version) – more lumens per gram is hardly possible at the moment, max. 5000 lumens at 111 grams weight (18650 aluminium version) incl. battery not only sounds brutal, it is brutal. However, this is no normal torch. The thing gets very hot very quickly, the operation is somewhat “complex” and the part is not a bargain. This lamp is also available with different LEDs, but not on every street corner. In addition to the 18650 version, a 26650 version is also available. For both, there is a short battery tube for 18350 or 26350. 26350 batteries, however, are hardly available anywhere.
- Last but not least – the ultimate light painting torch – here you can find my article about the torch.
I wish you all the time good light and enough battery charge.
Sven
Sven Gerard, Jahrgang 1969, geboren und aufgewachsen in Berlin. Er fotografiert seit frühester Jugend mit großer Leidenschaft. Neben dem fotografischen Erkunden zahlreicher beeindruckender verlassener Orte, widmet er sich seit mittlerweile 10 Jahren intensiv dem Lightpainting. Sein umfangreiches Wissen teilt er auf seinem Blog „Lichtkunstfoto.de“, weiteren Publikationen und in seinen Workshops. Darüber hinaus organisiert er Veranstaltungen zum Thema Lightpainting, wie „Light Up Berlin“. Gerard lebt gemeinsam mit seiner Lebensgefährtin in Berlin und hat einen erwachsenen Sohn.
Sven Gerard was born in 1969 and grew up in Berlin. He has been a passionate photographer since his early youth. In addition to photographically exploring numerous impressive abandoned places, he has been intensively involved in light painting for 10 years now. He shares his extensive knowledge on his blog ‘Lichtkunstfoto.de’, other publications and in his workshops. He also organises events on the subject of light painting, such as ‘Light Up Berlin’. Gerard lives in Berlin with his partner and has a grown-up son.


